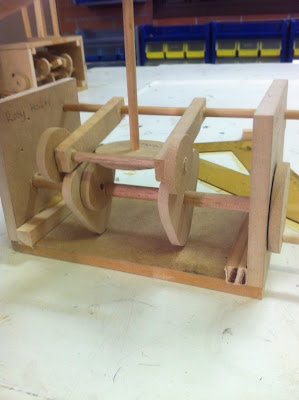
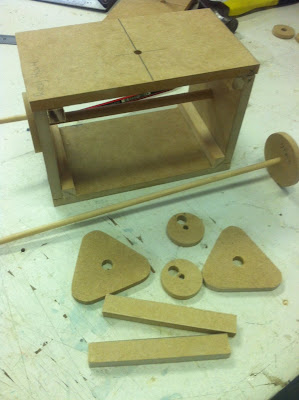
The image below shows the stage that I am at with my toy. Since my last post I have made the cam followers for the triangular cams and attached them to a small wooden dowel in the top corner of the box. I have also redrilled the main hole in the side lower as the mechanism couldn't fit inside the box. I will need to remake the lid as when I was hammering the small dowel through, the side snapped and when it was glued back on the lid did not fit.
This is a photo from the beginning of my toy showing some of the pieces disassembled, and below that is an image of these pieces put together with a temporary body to hold the cam follower in the centre in place.
I have been modelling my design off the one from the Mechanical Toys program, and hopefully it will turn out similar to it. The design can be seen in the image below.
Sunday, November 11, 2012
Thursday, October 25, 2012
My Mechanical Toy
So far I have made the box, handle and two triangular cams for my mechanical toy. The box was made by cutting out 4 pieces of wood (two 100mm x 100mm and two 200mm x 100mm) with the band saw and sanding them so that they were exactly the right size. These were then glued together with an extra piece of wood in the corners to increase the gluing surface and strengthen it. The top was left separate in order to make changes later in the design process.
The handle was made by cutting a cylindrical piece of wood and drilling a hole in a circular cam to fit onto this. A smaller hole was then drilled into the cam near the edge for the handle. A hole was drilled in the centre of the pieces of wood on the side of the box to fit this through. So far everything has gone well with my mechanical toy, and hopefully I'll be able to make it without too many problems.
The handle was made by cutting a cylindrical piece of wood and drilling a hole in a circular cam to fit onto this. A smaller hole was then drilled into the cam near the edge for the handle. A hole was drilled in the centre of the pieces of wood on the side of the box to fit this through. So far everything has gone well with my mechanical toy, and hopefully I'll be able to make it without too many problems.
Wednesday, September 19, 2012
Mechanical Toys - Perky Porky
The mechanical toy I have decided to make is Perky Porky. The mechanisms involved cause it to clap its hands while turning its head from side to side. It uses triangular cams connected to the pig's legs by bell crank linkages to create the clapping motion, which turns rotary motion into oscillating motion, and two circular cams for turning the pig's head, which also turn rotary motion into oscillating motion.
Tuesday, September 11, 2012
New Design Brief - Mechanisms
Our next design involves making a mechanical toy. Today we went on to an application on the computers to look at different designs that we can do. At the moment I am leaning towards doing the dog because I like how it looks and I can see how to make it. However it does look fairly simple compared to the others so I may add something to the design. I also like the pig and it seems more challenging than the dog. At the moment I don't know what I'll do because I want to be able to successfully make it but at the same time I don't want it to be too easy.
Thursday, August 23, 2012
My Vase and Stand
Over the past few lessons I have been gathering ideas and fiddling around with Pro Desktop, trying to make a good vase. In yesterday's lesson I made one that I am quite happy with, and today I made a stand to go with it.
To make the vase, firstly I did the outline of half of it on the frontal plane and revolved it around the axis to make the shape. I rounded the top edge to 10mm. Then I created a new sketch on the top of it and made a long, thin triangle with the base rounded so it fit against the edge of the top face. I then duplicated this with the circular option 35 times so it was all the way around the face and projected this through the entire part. Finally I put a circular hole all the way through the centre of the vase.
To make my stand, made the outline on the frontal plane, adding small semicircular indents to add interest to the design, and revolved it around the axis. I then added this to the vase and mated them together.
I thoroughly enjoyed completing this task and working with Pro Desktop and I am really happy with how my vase and stand turned out.
Thursday, August 16, 2012
Assignment
Last week we went through what we need to do for our assignment for this unit. Our task is to create a vase and a stand and put them together in the same document. We also have to do a 500 word essay on the advantages of using CAD in the modern design world. I'm not sure on what I plan to do for my vase, but in recent lessons I have been experimenting with different designs and fiddling around with the program to gain a better understanding of it, so I am feeling pretty confident with the task.
Thursday, August 9, 2012
Pro Desktop
In DF this term we have been doing 3D modeling on computers using a program called Pro Desktop. In the first few lessons we went through the basics of the program and began learning about all the different tools available.
We then moved on to making a pager in the next couple of lessons. During this task I grew to understand the program better and learnt to use new tools. By completing this activity I learnt to extrude and project profiles, round edges and a lot of other things. Since then we have also made a water bottle and two wheels. Some new things I learnt when making these was how to revolve a profile, how to shell an object and how to duplicate shapes. I am feeling pretty confident with the program now and am looking forward to starting work on the assignment.
We then moved on to making a pager in the next couple of lessons. During this task I grew to understand the program better and learnt to use new tools. By completing this activity I learnt to extrude and project profiles, round edges and a lot of other things. Since then we have also made a water bottle and two wheels. Some new things I learnt when making these was how to revolve a profile, how to shell an object and how to duplicate shapes. I am feeling pretty confident with the program now and am looking forward to starting work on the assignment.
Tuesday, June 5, 2012
Assignment Questions
1. Choose 2 machines that you used in the fabrication of your desk tidy. With these machines in mind, outline WPH&S considerations that must be adhered to when using these machines. Include photographs of your chosen machines (OnGuard may be an excellent resource for this question).
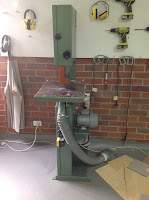
Band saw
• Long hair must be tied back.
• Safety goggles must be worn to prevent small pieces of objects from flying into your eyes.
• Never leave the machine operating when it is unattended.
• Use two hands at all times.
• Don’t have too many people near the machine.
• Always rest the material you are cutting on the table – do not hold it above the table.
• Keep hands away from the blade.
• Closed in shoes must be worn when using the machine.
• Material smaller than 3cm should not be cut using this machine.
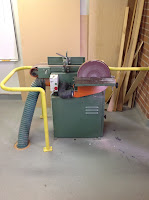
Belt sander/disc sander
• Long hair must be tied back.
• Safety goggles must be worn to prevent small pieces of objects from flying into your eyes.
• Never leave the machine operating when it is unattended.
• Use two hands at all times.
• Closed in shoes must be worn when using the machine
• Material smaller than 3cm should not be sanded using this machine.
2. The material you are using for your desk tidy is called Polymethylmethacrylate (ACRYLIC). It has specific properties and uses. Choose 2 other common polymers and in table form give their industrial name, common name, properties and uses.

3. Extrusion, injection moulding, compression moulding, vacuum forming and laminating are examples of common manufacturing processes used with polymers (Plastics). Choose one process and with the use of diagrams and bullet points outline the process.
Vacuum Forming:
-Firstly, a mould is made using a material such as wood of cardboard. The edges are made at an angle that will make it easy to remove the plastic after it is formed.
-This mould is then placed in the vacuum former.
-A sheet of plastic is clamped above the mould.
-A heater gradually melts the plastic so it becomes pliable. After a few minutes it is ready for forming.
-The heater is then turned off and a lever is used to lift the plastic until it is in position.
-The vacuum is the turned on, which pumps the air out from beneath the plastic sheet, causing it to form around the mould.
-After the sheet has cooled down and become solid again, the vacuum is turned off and the sheet and mould are removed from the vacuum. The sheet would have taken the shape of the mould.
4. Extension Work - Using processes acquired from your maths lessons, calculate the amount of acrylic sheet that your FINAL desk tidy represents. Show all calculations; answer needs to be in square metres.
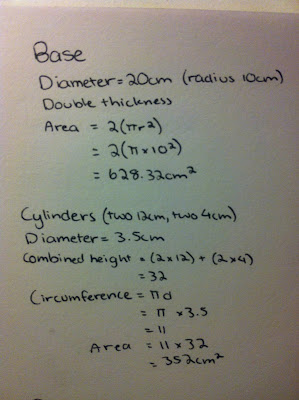
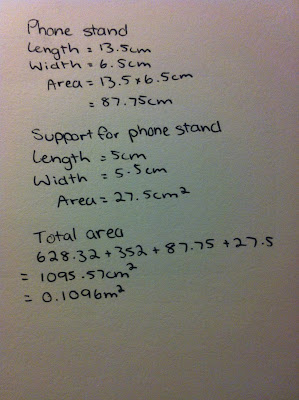
Therefore, the amount of acrylic used in my desk tidy is 0.1096 square metres.

Band saw
• Long hair must be tied back.
• Safety goggles must be worn to prevent small pieces of objects from flying into your eyes.
• Never leave the machine operating when it is unattended.
• Use two hands at all times.
• Don’t have too many people near the machine.
• Always rest the material you are cutting on the table – do not hold it above the table.
• Keep hands away from the blade.
• Closed in shoes must be worn when using the machine.
• Material smaller than 3cm should not be cut using this machine.

Belt sander/disc sander
• Long hair must be tied back.
• Safety goggles must be worn to prevent small pieces of objects from flying into your eyes.
• Never leave the machine operating when it is unattended.
• Use two hands at all times.
• Closed in shoes must be worn when using the machine
• Material smaller than 3cm should not be sanded using this machine.
2. The material you are using for your desk tidy is called Polymethylmethacrylate (ACRYLIC). It has specific properties and uses. Choose 2 other common polymers and in table form give their industrial name, common name, properties and uses.

3. Extrusion, injection moulding, compression moulding, vacuum forming and laminating are examples of common manufacturing processes used with polymers (Plastics). Choose one process and with the use of diagrams and bullet points outline the process.
Vacuum Forming:
-Firstly, a mould is made using a material such as wood of cardboard. The edges are made at an angle that will make it easy to remove the plastic after it is formed.
-This mould is then placed in the vacuum former.
-A sheet of plastic is clamped above the mould.
-A heater gradually melts the plastic so it becomes pliable. After a few minutes it is ready for forming.
-The heater is then turned off and a lever is used to lift the plastic until it is in position.
-The vacuum is the turned on, which pumps the air out from beneath the plastic sheet, causing it to form around the mould.
-After the sheet has cooled down and become solid again, the vacuum is turned off and the sheet and mould are removed from the vacuum. The sheet would have taken the shape of the mould.
4. Extension Work - Using processes acquired from your maths lessons, calculate the amount of acrylic sheet that your FINAL desk tidy represents. Show all calculations; answer needs to be in square metres.


Therefore, the amount of acrylic used in my desk tidy is 0.1096 square metres.
Desk Tidy Evaluation
Aesthetics
The design of my desk tidy is simple, but looks nice. It is simple enough that it isn’t crowded, but at the same time isn’t boring either. The only thing I would change about the aesthetics of my desk tidy is the colours. Originally I planned on using lack for the base and the cylinders, and red for the stand. However, when I started making it I realised I had accidentally used a transparent black sheet instead of a solid black one for the base. I kept it as this, as it looked fine, but later I found out that there were only clear cylinders. Due to this, there are many colours on my desk tidy that don’t really match, but also don’t look too bad. In my opinion, my desk tidy looks nice, but if I were to do it again I would change the colours.
Ergonomics
My desk tidy is easy and comfortable to use, as it is small enough to not get in the way when it is on a desk and easily holds the items it is meant to. It is small so it doesn’t take up much space. The ergonomics of my desk tidy could be improved if the cylinders had a larger diameter. This would make it easier to get items out of them, and they would be able to hold more things.
Economics
The economics for my desk tidy are very good. Seeing as the average price for a sheet of acrylic is $95.7 for 3 square metres and my desk tidy only uses up 0.1096 square metres, the materials for my desk tidy only cost $3.50. This is a lot cheaper than it would cost if it was purchased from a shop. The acrylic sheets were also shared between classes, so not much of it was wasted.
Function
My desk tidy solves the problem that was presented. It works effectively as a desk tidy that caters to my own needs and is smaller than 200mm x 200mm. It can be used to organize my desk, and holds pens, pencils, my keys, my phone and other small items. The function could be improved if the cylinders had a larger diameter, or if there were more of them because then they would be able to hold more things.
Tuesday, May 22, 2012
Completed Desk Tidy
This is my completed desk tidy which I finished a few lessons ago. I have had a lot of fun making it, and I'm very pleased with how it turned out!
Wednesday, May 9, 2012
Reflection 09/05/12
For the last few lessons I have been continuing work on my desk tidy. I cut out all the cylinders that I will be using with the band saw, and then sanded them so that they were smooth. After I finished cutting out everything I would be using I found that I won’t have to alter my design after all, as it will all easily fit.
A small problem that I came across was that my phone is quite heavy, and the stand would need some support or it would snap off. I then decided that I could just cut out a small rectangular piece of acrylic and glue it behind the stand so that it will stay up. I sanded the edges of this piece on a diagonal slant so that it would be easier to glue to the stand and the base of the desk tidy.
At the end of the lesson today I began gluing everything together. So far I have glued the two small cylinders onto the base, and I have glued the stand to its support. I don’t have much left to do, and hopefully I will finish making my desk tidy in the next lesson.
Wednesday, May 2, 2012
Reflection 30/04/12
Today I continued work on my desk tidy. The piece I was going to use for my iPhone stand ended up being slightly too small, so I needed to remake that. After I had done that I used the strip heater to bend the acrylic being used for the stand. I may need to alter my design slightly in order to fit everything on the base. This would involve either placing the iPhone stand at the back or at the front instead of the middle. I’m not sure which of these I will do yet, but after I have all the things ready to glue on I can fiddle around with it and see which design I like best.
Monday, April 30, 2012
Starting on My Desk Tidy
So far I have had two lessons in the workshop making my desk tidy. In this first lesson I cut out two squares of acrylic and glued them together for the base. In the next lesson I sanded this down into the shape of a circle and cut out and sanded the piece I am using for my iPhone stand. So far everything has gone well, except for the colour of the acrylic for the base. When I chose it I thought that it was solid black, and I didn't realise that it was transparent until the end of the lesson. I have decided to keep working with this colour as I don't want to waste time remaking the base.
Isometric Drawing of Desk Tidy
This is the isometric drawing of my desk tidy design that I drew in class today. I am happy with how it looks, and it will be able to hold the the nessicary items. The front two tubes can be used to hold small items, like keys and coins, while the back two tubes can be used to hold longer things, like pencils and pens. I'm looking forward to starting to work on my desk tidy and hopefully it won't be hard to make.
Thursday, March 22, 2012
Video Report - Plastics and Design
-You have to understand the materials you are working with to get the best out of them
-Polypropylene is easy to use, keeps its shape well and is microwaveable
-To make some designs, hot plastic is injected into moulds. It solidifies quickly, and then the mould separates to release the plastic
-Almost anything can be made out of plastic
-Come up with a few ideas during ideation
-Drawings of designs need to show details
Tuesday, March 20, 2012
Desk Tidy Design Brief and Ideas
Recently we went over the design brief for our next task. We are to design and make a desk tidy to suit our own reeds. After the design brief we went on a tour of the workshop and went over the machines we can use to make our desk tidy. These include a strip heater, for bending the acrylic in a certain spot, the oven, which makes the acrylic easy to bend. We can also use spade bits to drill holes in the acrylic, rather than regular drills which would crack it.
We have also started ideating. There are many colours that we can choose from, and I have decided on either red or black. Some of the things I need to store in my desk tidy are my keys, USB, headphones, phone, coins and some pens and pencils. I'm not sure on what design I'll use to make this yet, but I do have several ideas. Hopefully I will finalize my design before next week so that I can start in the workshop before the term ends (:
We have also started ideating. There are many colours that we can choose from, and I have decided on either red or black. Some of the things I need to store in my desk tidy are my keys, USB, headphones, phone, coins and some pens and pencils. I'm not sure on what design I'll use to make this yet, but I do have several ideas. Hopefully I will finalize my design before next week so that I can start in the workshop before the term ends (:
Monday, March 12, 2012
Evaluation
Function
My lamp solved the problem that was presented. It works effectively and efficiently as a small LED desk lamp. The function of the lamp could be improved by making it with a switch so that it doesn’t have to be turned off form the wall.
Aesthetics
The design of my lamp is simple, but effective. Its shape causes it to give off enough light to easily illuminate work on a desk, without shining into your eyes. In my opinion, my lamp looks nice as the style and colours are not elaborate.
Ergonomics
My lamp is comfortable to use as the light doesn't shine too brightly into your face, but can still easily illuminate work on a desk. It is small, so it doesn't take up much room on a desk. The only inconvenience is that there is no switch on the lamp to turn it off and on, so this has to be done at a wall.
Economics:
The economics for my lamp were very good. The materials for each lamp didn’t cost very much, and mine cost a total of $12.10. The reason for the difference in price between the lamps is due to the different amounts of LED lighting used.
Assignment Questions
Q1 What is the actual difference between light of different colours?
Light comes in different colours, normally mixed together. The different coloured lights are created from different wavelengths. For example, red light has the longest wavelength, and violet has the shortest wavelength. When all of the colours of light are together, they create white light. When looking at an object, the colour you see is the colour of light that it reflects, while absorbing all other colours.
Q2 Define the following terms
Ambient light: Ambient light can refer to both natural light, and light from an artificial source. It is soft indirect light that fills a room.
Direct light diffuser: A light diffuser disperses light to make it softer and not as harsh.
Luminosity: Luminosity describes the brightness of a light
Energy efficiency: Energy efficiency refers to the amount of energy being used
Watts: A unit for measuring energy
Q3 Comment on global warming
Global warming is a major problem in today’s society. It refers to the average temperature of the Earth’s atmosphere increasing. There are many things that cause it, the main one being the rising amounts of greenhouse gases produced by burning fossil fuels and deforestation. When fossil fuels are burnt, they release carbon dioxide gas into the air. This wouldn’t be as much of a problem if it weren’t for deforestation. Trees take carbon dioxide out of the air and change it into oxygen when they photosynthesize, but because of deforestation there are less trees so the amount of carbon dioxide in the air is increasing. Another way greenhouse gases are created is from different forms of transport, like cars, trains and buses.
There are many problems that come from global warming. Due to the rising temperatures, the icebergs are melting, and this is causing the sea levels to rise and many animals to die. Polar bears use the ice to hunt for their food, and with the ice melting their range for hunting is reduced, so many of them are starving to death. The polar bears are losing their habitat as the ice platforms are shrinking and moving farther apart, so the bears have to swim further between the icebergs, and often they become too tired and drown. Global warming is affecting many other species in similar ways and they will soon be extinct if nothing is done to slow global warming.
Another problem that comes from global warming is extreme weather conditions, like draughts, heavy rain, severe storms and heat waves.
There are many ways that global warming can be decreased or slowed down. These include using energy efficient items, reducing use of cars, trains and other forms of transport that pollute the atmosphere, recycling materials and cutting down less trees. If these simple steps were taken global warming could be slowed.
Q4 How can the modern home become more energy efficient with regard to lighting?
The modern home could become more energy efficient by using solar powered lights, energy efficient lights, and not leaving lights on when they aren’t needed.
Q5 Research a modern-day lighting designer and comment on their contribution to the design world.
Claude Engle is an internationally known lighting consultant. He has designed lighting for many significant structures. These include the Louvre and the Reichstag.
Saturday, February 25, 2012
Reflection
We have been in the workshop for a few lessons now, and so far I have bent the aluminium and drilled it onto the wooden block. Then I found out that I need to have it off the wooden block to be able to do the wiring, so I unscrewed it and I have started on the lighting. I have cut my strip of LED lighting and attached it to the wiring.
Tuesday, February 7, 2012
08/02/12 Reflection
Today in class we made our designs with wire so that we could see what it would look like and we could get the shape right. I found out that my design will not be too hard to make as there are things other than the metal cylinder that I can bend my aluminum around. Mr Ward hasn't brought us in chocolate yet. Hopefully he will see this and remember to bring it to the next lesson! (:
Monday, February 6, 2012
Lamp Designs
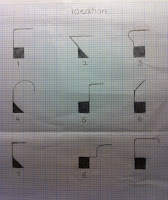
These are my ideas for my desk lamp design. I would like to do the forth design, but I am worried that It will be hard to get the curve right on the aluminum. I spoke to Mr Ward today in class and he said that I should give it a go, and if it doesn’t work out there are spare pieces of aluminum so I could just restart and alter the design. I am really looking forward to starting in the workshop, hopefully we will be in there later this week (:
Isometric Drawings
Wednesday, February 1, 2012
02/02/12
Today in class we were introduced to isometric drawings and spent the lesson playing around with different shapes and seeing how to draw them. Yesterday we started ideating, but I was away for that lesson so I need to catch up on that.
Subscribe to:
Comments (Atom)
